Being the multi-taskers that we are, we thought it might be a good time to finally get the cracks in the master bedroom fixed. Just to jog your memory (or if you're new to our blog), shortly after we moved in, we noticed cracks in the master bedroom reemerging. As they grew bigger, we began to grow more nervous and eventually hired a structural engineer from Indy to come down and assess the situation. In short, he told us our back-corner foundation issue was due to the neighbor's maple and we should get that cut down asap, get the cracks fixed and repaired by professionals, and tuckpoint the parts that need work on the exterior of the home. We got the maple cut down right away, but we couldn't get the bedroom cracks patched because the room was FULL of storage. During the late winter months, we slowly moved items out and once I finished teaching for the summer, I started calling plaster contractors to get bids.
 We ended up going with a company called Kelly Plastering. Not to brag about them, but Tom Kelly (and his brother Tim) are PASSIONATE about plaster. These guys LOVE the stuff and are superior craftsmen. I highly recommend Tom and Tim (also known as Slick) to anyone in the Bedford/Bloomington area. Since repairing the plaster was a one man job, Tom started working solo in the bedroom on Thursday June 10. About two hours into the job I hear, "Tiffany, could you come here for a second?" So, I walk over to the bedroom and Tom says, "Your wall is rotted out. Look, it's just coming out in huge chunks."
After a contemplative pause,
 I quietly said to Tom, "Tom, I'm going to call my husband. I think it's best if you give this news to Ben." Tom graciously explained the situation to Ben and then we got to work. I sprang into action becoming Tom's sidekick. As he ripped down the walls, I started to move the debris into black bags. I will add that before the cracks emerged in our walls, we had new carpet put into the bedroom, so as you look at the demo picture to your left, keep in mind brand new carpet is dwelling underneath the rubble and dust.
As noted in the picture of a close-up of the wood,
 not only was a majority of the frame rotten, (surprise!) it seems that there was termite damage at some point. Had there been live termites (that SWARM mind you when disturbed), I would have screamed, so I'm glad I didn't have to deal with that as well. I should add that though the little guys were present in the past, the house is primarily composed of cement blocks and limestone. Given there is practically no wood in the framing in the main portion of the house, I hope that the termites that once visited us are happily munching away on some other home.
 Tom and I completely demoed the wall and rebuilt the frame. While Tom worked and I grabbed the various tools that he needed, introducing him to Festool products along the way. I think the Kapex (the compound sliding miter saw) sold him on the system. Before Tom left at the end of the day, he let me know that in the morning he was going to bring his brother to finish out the plaster job while he repaired the walls.
That night, when Ben came home, we worked until 1 a.m. cleaning up the master bedroom area. We re-secured the plastic protective sheets to the wall and Ben did more demo work (as there was some mold behind the back of the tub). Exhausted and dirty, we both took long showers. On Friday morning, Ben took a shower and went to work. Shortly after he left, Tom and Slick arrived. 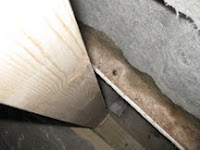 Although I was upset that Ben had showered in the morning (seeing as how Tom and I were going to demo out the drywall that had been installed around the tub in lieu of cement board - don't even get me started on that), I'm really glad that Ben showered because Tom discovered that our tub was leaking! Tom and I didn't catch the leak the day before because the leak was so small, but any leak behind a bathroom wall is deadly. The cause of the leak, you ask? Well, it turns out that the tub wasn't level due to an oversized plumbing access hole.
Let's just say, I'm surprised the tub didn't fall into a hole (though it would have made for an interesting blog post). In addition to the lack of support, the tub lacked effective caulk. Though silcone caulk had been used when the tub was assembled (fyi - we have a two piece tub/shower unit), the caulk probably gave way when people were standing in the shower. Rather than buy a new unit, Slick suggested we try to fix the tub, so Tom secured the base for us and caulked the interior seams. Notice the steel support beam below the tub's feet. Once the tub was repaired, we just had to wait 2-4 days for the caulk to cure. No inconvenience there.
 Although I was upset that Ben had showered in the morning (seeing as how Tom and I were going to demo out the drywall that had been installed around the tub in lieu of cement board - don't even get me started on that), I'm really glad that Ben showered because Tom discovered that our tub was leaking! Tom and I didn't catch the leak the day before because the leak was so small, but any leak behind a bathroom wall is deadly. The cause of the leak, you ask? Well, it turns out that the tub wasn't level due to an oversized plumbing access hole.
Let's just say, I'm surprised the tub didn't fall into a hole (though it would have made for an interesting blog post). In addition to the lack of support, the tub lacked effective caulk. Though silcone caulk had been used when the tub was assembled (fyi - we have a two piece tub/shower unit), the caulk probably gave way when people were standing in the shower. Rather than buy a new unit, Slick suggested we try to fix the tub, so Tom secured the base for us and caulked the interior seams. Notice the steel support beam below the tub's feet. Once the tub was repaired, we just had to wait 2-4 days for the caulk to cure. No inconvenience there.
 Before I end this particular post, I should note that Tom and Slick did an awesome job with the plaster repair in the rest of the room. It's really a fascinating process. You can use steel support mesh to help secure the walls that have severe cracks (see pic) and then plastering is completed in a two part process. First you apply a thick almost concrete looking layer over the wire mesh and once the plaster sets firm to the touch, a thin coat layer is added
 . The plaster must dry for 21 days before it can be painted. Now, since the back of the bathroom wall still needs to be done, which will probably be later this week or next, I anticipate we'll get the room painted sometime late July. On the bright side, at least we'll have PLENTY of time to pick out paint colors. I've added an image of the finished plaster work just so you can see what the finished wall repair looks like at the moment. Again, they did an amazing job.
TEASER -- Check back again soon as if you think our situation is bad right now, wait until you read the next post. We're just gettin' started. . .

Great blog. Im a first time reader and im hooked. Good infoo and interesting read. cant beat that.
ReplyDeletebrian
www.toolking.com/brand/festool-tools/
Brian,
ReplyDeleteThanks for following! Tiffany wrote a lot about some Festool tools that we used in the next posting. I used to work there and am a believer in the system...though this is just about us really and the reno and not a corporate plug for anything. In fairness we should also direct people to:
www.festoolusa.com
The home website with the greatest detail on the tools.
Keep following. We're making progress. You'll see some great stuff.