It's amazing that a month has already gone by since the walls first came down. We are happy to report that our plaster contractor, Tom Kelly, is finished with his magic as he repaired the walls in the master bedroom, closet, and hallway. It is so nice to have walls back again, even if bathroom might be missing a few (more on that later). The curing time for plaster to set fully takes 21 days, so we'll probably be able to start painting the bedroom sometime in August. If you are interested in visiting our home in the future, just hang tight. Though completing a bedroom is a step in the right direction, you'll probably find your stay more enjoyable when the bathroom is finished as well.
So what's going on in the bath, you may ask? Well, 60% of the flooring is up, all the wall paper is down, and the wall areas where the tile will go are currently awaiting the application of cement board (
Note - you can view Ben in action tearing out the walls by viewing the picture at the left). Currently Ben is in the process of building out the wall behind the vanity to ensure the wall is plumb before we put up the cement board and tile. We have all the wall tile now in our possession and just need to get the grout and tile tools purchased and we'll be ready to go in that respect. The floor tiles have been purchased and should arrive mid-July.

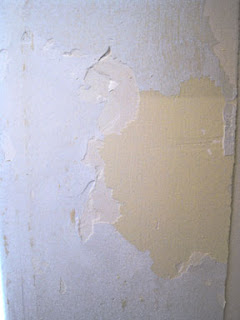
In the meantime, I would like to briefly share some history about our walls. It would seem that when the bathroom was remodeled, someone didn't want to bother with the prepping process, lucky us. Just so you can visualize this situation, the walls were originally a light sea foam green, followed by a pink mauve, neutralized later by a light sand color, and then topped off with a skim of drywall and a layer of white paint. The issue I have is not with the layers of paint themselves, but rather, the skim of drywall and the paint job that followed. In the process of removing the wallpaper and sanding, we noticed that some sections of paint literally peeled off of the wall like plastic. As you can tell from the close-up picture of the wall (which I enhanced in Photoshop for viewing purposes), various layers of paint form an exterior that is so varied you may be reminded of your local roads or perhaps the lunar surface. As if the peeling paint were not enough, there are also a few typical hairline cracks by the edges of the windows and a nice thin vertical crack behind the toilet. Once you consider that we're also dealing with various materials on the walls (both drywall and plaster), you'll see why we have a bit of a mess on our hands. The lack of prep work on the part of the former owners means that we'll have to fix the walls like the pros. Our plan (which is based on the folks at Fine Homebuilding) is to:
- Patch the cracks in the plaster (Done - thanks Tom!)
- Clean the walls with TSP
- Sand the walls with an orbital sander
- Clean the walls of dust
- Put down a coat of drywall sealer
- Adhere three foot strips of fiberglass mesh tape around the entire room (with 1" overlap)
- Carefully layer one thin coat of all-purpose drywall mud over the fiberglass mesh
- Wait 24 hours for mud to dry and then fill/sand spots that need to be addressed
- Repeat Step 7
- Repeat Step 8
- Prime
- Paint
So, although we could have done what the former owners did (e.g. install uneven drywall and hide shoddy prep work with wallpaper), we happen to have a conscious and will make this situation right again.

Speaking of righting a wrong, it would seem that our little bathroom originally contained a half-tiled wall behind the vanity. Within the wall, we discovered pieces of the original tile, which Ben models so well in the photograph. We still have one tile precariously glued to a copper pipe, perhaps installed as a shim by the original builder. The tile was a lovely turquoise/sea foam green, very typical of the 1950's. Ben and I find it humorous that we are basically restoring the wall to its original design. Here is a side-by-side comparison photo of the two tiles. Pretty neat, huh?


 In the meantime, I would like to briefly share some history about our walls. It would seem that when the bathroom was remodeled, someone didn't want to bother with the prepping process, lucky us. Just so you can visualize this situation, the walls were originally a light sea foam green, followed by a pink mauve, neutralized later by a light sand color, and then topped off with a skim of drywall and a layer of white paint. The issue I have is not with the layers of paint themselves, but rather, the skim of drywall and the paint job that followed. In the process of removing the wallpaper and sanding, we noticed that some sections of paint literally peeled off of the wall like plastic. As you can tell from the close-up picture of the wall (which I enhanced in Photoshop for viewing purposes), various layers of paint form an exterior that is so varied you may be reminded of your local roads or perhaps the lunar surface. As if the peeling paint were not enough, there are also a few typical hairline cracks by the edges of the windows and a nice thin vertical crack behind the toilet. Once you consider that we're also dealing with various materials on the walls (both drywall and plaster), you'll see why we have a bit of a mess on our hands. The lack of prep work on the part of the former owners means that we'll have to fix the walls like the pros. Our plan (which is based on the folks at Fine Homebuilding) is to:
 Speaking of righting a wrong, it would seem that our little bathroom originally contained a half-tiled wall behind the vanity. Within the wall, we discovered pieces of the original tile, which Ben models so well in the photograph. We still have one tile precariously glued to a copper pipe, perhaps installed as a shim by the original builder. The tile was a lovely turquoise/sea foam green, very typical of the 1950's. Ben and I find it humorous that we are basically restoring the wall to its original design. Here is a side-by-side comparison photo of the two tiles. Pretty neat, huh?